Sunday, February 21, 2016

Dollar Store Apothecary Jars!

Apothecary Jars. 
Anyone whose decor obsessed has heard of these before. You either have them already or you've been dreaming of them like me. I'm honestly not sure where apothecary jars originated from, but I know that Pottery Barn had a line of them, and as far as I know, that's when they got really popular. They have this crisp clean, expensive feel to them that everybody wants. Wether you use them in your bathroom or your kitchen, for candy or cotton balls, they are versatile and stylish. 

The problem with these popular decor jars is that Pottery Barn charges, like, an arm and a leg for them. I saw on Pinterest that people were re-creating these apothecary jars in a ton of different ways. So, of course, I chose the most inexpensive method. The Dollar Store. Duh. 

Alright, i'll stop rambling. Read on dolls...

1.) Supplies
 I had to return to The Dollar Tree like THREE TIMES before I could finally get my hands on one of these vases. For this project, a particular vase is required in order for the lid to fit correctly. You will need to get a vase with a flared rim. If you can't seem to find them in store...you can buy them online here!! 
As for other supplies, you'll need the lids. You will find these in the kitchen section of the store. They are glass sauce bowls. Small bowls you would use for something like a side of ranch or salsa. These shouldn't be hard to find and they come in packs of three or four. Then grab yourself a candle stick holder from the candle and vase section. The only things that I didn't get from the Dollar Tree were the Epoxy Glue and the drawer knob. I had the glue on hand and the dresser knob is from Hobby Lobby. It was about $2. The ruler and the marker are used for marking the center of the lid and the center of the bottom of the vase, which we will go over in the next step!

2.) Mark Your Center
 Okay, so in these pictures you can hopefully notice a small silver spot on the center on the item. The top photo is of the bottom of the vase and the bottom photo is the top of the lid. The reason we mark the center is so we can place the candle stick holder and the dresser knob on the center points so that they don't come out lopsided. 
The best way to measure the center is mostly common sense. Just measure across and mark the center then measure vertically and mark the center. Line your markings up for the center most point of your item. 

3.) Glue The Lid & The Stand

 I didn't take pictures of the gluing process because, well, it's that simple. Just put your Epoxy Glue on the top rim of the candle stick and place the vase, centered, on top. I used a toothpick to be precise with the glue but it does dry clear so don't worry too much if it's a little messy. Place something heavy on top of the vase to seal the glue and let it sit for about 5 minutes. As for the knob on top, just repeat the glue process and place it on the center of the lid. Let it rest for five minutes and you're done!! Its literally that easy guys. 


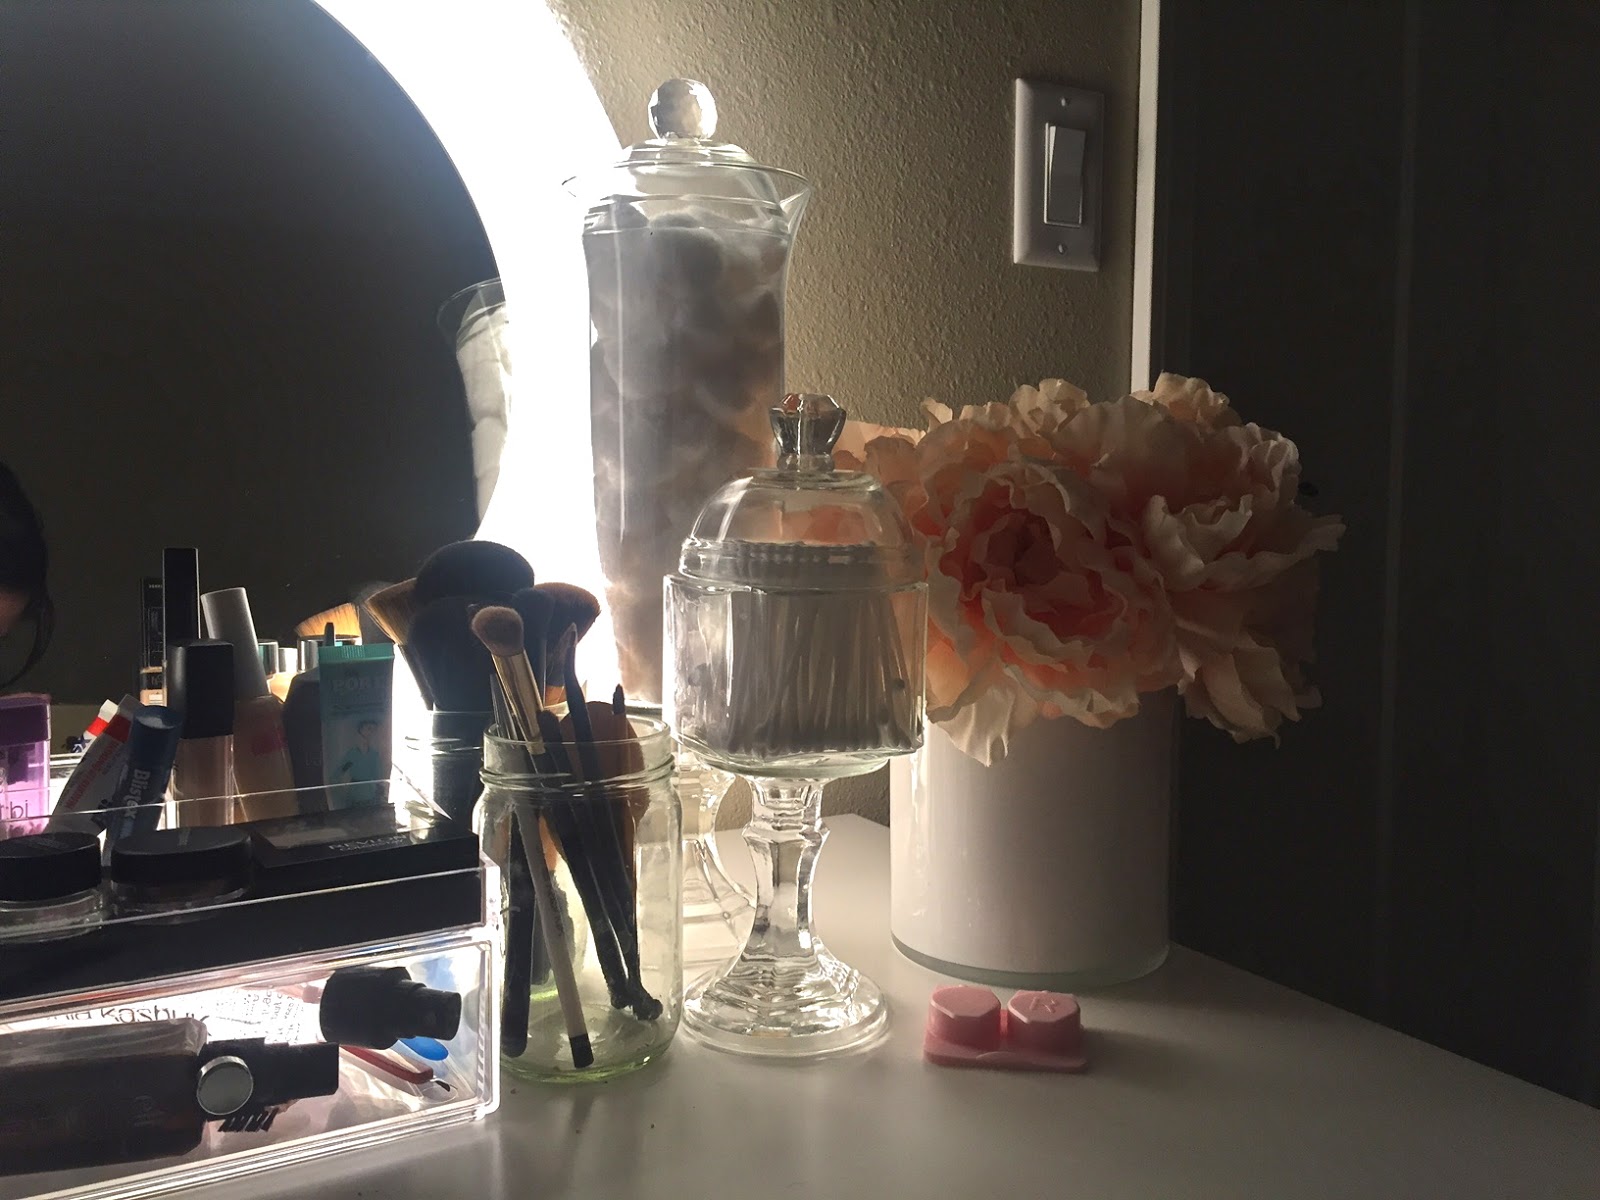
I used mine on my vanity...which we will be talking about in my next post ;) They hold my cotton balls and my Q-tips. This makes it so much easier when I'm getting ready in the morning and getting ready for bed. They are easily accessible...plus, they are so pretty to look at! 


 P.S. The jar holding my Q-tips is actually an old cotton ball jar I had in my bathroom. I replaced it's lid with one I made (the same lid we created for this tutorial) and added a candle stick! I encourage you to look around your house and try to find items you already have that you could convert like this. It's the most cost effective way to create new decor for your home!

I hope that you guys enjoyed this post! Leave a comment if you have ever done something similar and send me pictures of your version! I'd love to see your ideas!

Thanks so much for reading. Keep an eye out for my next post on my new vanity! 
Until then, don't forget to subscribe via email (we never spam!) and follow me on social media!
Instagram: thecaliforniacupcake
Pinterest: Shannan Gladwin


XO.


Thursday, February 11, 2016

DIY Coat Hooks!

Recently, we transferred ourselves from a one bedroom to a two bedroom unit and added a roommate to the mix. Why? Well, because moving across the country twice a year wasn't quite enough for us...so we thought we would throw this in too! *rolls eyes*. We stayed in the same complex, the one we talked about in my New Apartment Tour! post. We all know how obsessed I am with this place, we just wanted a little more space, plus, we save a little on rent every month...win, win! Anyways, the point of all of that was to explain that our new roommate has brought in some new additions to our apartment, including a wine rack (that he made by hand...that's right guys, I now live with A CARPENTER...think of all the possibilities!). The list also included coat hooks that were simple and totally efficient, but needed a little update...so guess what...that's right, I painted it! Shocking, I know. But what can I say. 

So with this project, I obviously started with a finished coat rack that just needed to be re-painted. However, it would be ridiculously easy for you to do a quick run to Home Depot and pick up one of these babies for $1.75, some hooks and screws, and boom...coat hooks. For the sake of this post though, we are obviously going to skip right to the painting part. 


1.) First we picked up all our supplies!

You can use a regular screw driver instead of the drill, but I'm all about quick and easy. As for the other things you see here, we grabbed primer for about $8, a Beher paint sample that we talked about in this post! in whatever shade of white you like. A 2" paint brush, an inexpensive one, a paint stir stick, and one of those thingy-majigs that opens the paint cans nice and easy. Not pictured is some 3m sand paper! And then of course, your completed coat hooks!

2.) Take all your hooks out...


Obviously if you are putting together your own hooks, just paint it before you install the hooks ;) 

3.) Sand it all down!


Make sure you sand every side and edge! 

4.) Prime Prime Prime!


Paint a nice even coat of primer all over your base. Don't miss any edges or sides! I mention in a few of my other posts how important priming is, so I'm sure you already know...but for my new readers, priming helps even everything out, smooth everything over and it gives your paint a nice base to stick to! I did a quick coat of this and let it completely dry before I began painting.

5.) Paint and add your hooks!


Once your primer dries you can paint it whatever color your little heart desires! Wait for your paint to completely dry and then screw your hooks in place and done! 

I used these hooks near the front door in combination with a shoe rack for our own little mud room :) 


This project was done in one day. It was so easy and now the coat hooks aren't just functional, they're pretty! :) 

I hope you all enjoyed this little update! I've got a ton of stuff for you guys over the next week or two so make sure you subscribe via email! (We only email you about new posts!) and follow me on social media! 
Pinterest: Shannan Gladwin
Instagram: @thecaliforniacupcake


XO. 

Friday, January 1, 2016

Updated Whiteboards + How To Get Custom Paint Crazy Cheap!

Happy New Year everyone! I hope everyone had a safe and happy New Year's Eve. We are finally back in Minnesota after a long vacation at home in California! If you missed my last post, my future hubs, our pup, and I, took a two week trip to California for our best friends' wedding and for Christmas. It was such an amazing experience getting to stand next to my best friend while she married the best guy! It's a trip we will never forget and it was so nice to get away from the cold for a couple weeks. 

Is it a thing to have, like, a travel hangover?! Because, if that's not a term yet, I am definitely making it one. The first few days back were rough. I was definitely built to live in California...hence, the blog title. ;) But, now I am back and have a couple projects to share with you all! 

Today we are going over these older whiteboard calendars I have had for at least 3 or 4 years. I honestly don't even know if I've ever actually hung them on the wall. It was one of those purchases where I had every intention of using them to get my sh*t together, but it mostly sat in the corner and got erased every few months...don't lie, you know you've done this too...


Anyways, now that they're all pretty and pink, I couldn't just leave them in that corner! So they hang in my office space. 
I started with this whiteboard made by The Board Dudes that I got from Target years ago. The Board Dudes have it listed on their site for $14.99. I also used the blank whiteboard you see below the calendar but for the sake of the tutorial, I'm showing you how I did the calendar. **The steps for the blank whiteboard are the same obviously. 
 1. Sanding:
I used 3M sand paper in 150 fine. It was just a couple bucks for nine sheets and for both boards I used like one and a half sheets so you'll get a lot of use out of the pack! Sand everything down lightly to get some of the black paint and the shine off. Always make sure you sand before you repaint something so the primer and paint are smooth and have something to stick to.
2. Tape:
Use painters tape or masking tape to line the edges so you don't get any paint on the whiteboard.
3. Prime:
Make sure you prime your surface, I painted these from black to a blush pink so the primer really helps that color transition smoothly without so many coats. It will also protect your project from chips and wearing. I found this primer at Lowe's for about $9. I hardly used any for this project. It will definitely go a long way!
 4. Paint:
Once your primer dries, you are ready for your first layer of paint! I am currently obsessed with blush...if you read my posts regularly, I'm sure you already know this though. I made my color selection from the choices that Sherwin Williams offers at Lowe's because...here's the big secret on how to get custom paint for cheap...Sherwin Williams offers "tintable samples" (which just means they can be custom mixed to whatever color you want) and they're QUART SIZED samples!!! I am not kidding. And guess how much a paint sample is...$3.50. I mean, maybe I am missing out on some other crazy paint secrets or something, but $3.50 for a quart of CUSTOM COLOR, good quality, paint is like unreal. Run...don't walk...to Lowe's right now! I highly recommend this for any DIY projects you're doing, because worst case scenario, you hate the finished product and you're out $3.50. Not much risk there. Here is the sample container of paint I used, the color is called Quaint Peche (SW6330). I hardly used any of this paint for this project. I could probably do 50 projects like this with the same quart of paint. This is a new holy grail guys!
5. Remove Tape:
Once your paint dries, remove the tape and you're done! 


I also did a quick gold spray paint on those circle magnets for a really feminine touch! Quick and easy but really makes a statement. 


Do you have any old office items that could be transformed? Tell me about them in the comment section!

Don't forget to subscribe via email (we never spam!) and follow me on social media!
Instagram: @thecaliforniacupcake
Pinterest: Shannan Gladwin

XO.

Tuesday, December 15, 2015

10 Easy IKEA Hacks To Inspire You!

Happy Holidays Guys!! I hope that everyone is having a fabulous December and is loving the holiday season! I was lucky enough to escape Minnesota for two whole weeks and spend the holiday in California with all my loves! I am so happy to be here with the sunshine on my face. But even more exciting is that friends and family have been saving their projects and sparsely decorated areas just for my visit! (They know me so well ;) ) So today, as I look for inspiration for some of these new spaces, I thought I would share with you some of the easiest and most cost efficient IKEA hacks ever! These are not all of my favorites, because let's face it...ain't nobody got time for that honey...but these are PERFECT if you only have a quick weekend to get stuff done! I hope they inspire you to get creative and create a space you totally love!

1). Vittsjo Nesting Table
Ya'll know how I feel about gold spray paint...(insert holy grail emoji here). Check out this easy DIY from Classy Clutter! 
 

2). Lack Side Tables
$16 for a cute side table? Done! You could also add some brass corners or some paint for an extra special touch! Find out how at I Heart Organzing!

3). Office Chair Hack
Personally, I think office chairs are super over priced...enter, IKEA hacks. Here is one of my faves! Find it over at Little Green Notebook! 
  
4). Bondis Wall Clock
Fancy up an ordinary wall clock with a vintage belt. Read more about it on Remodelista!

5). Bygel Bar Cart
Stay extra classy on a budget with this cute (and gold!) bar cart! Check it out at History In High Heels! 
 

6). Ekby Shelf Brackets
Add a little spray paint to your Ekby brackets....gold spray paint...need I say more?!
   
7). Console Table
Turn this laptop table into a lovely console table...I think this would love amaze in an entry way? Feel me? See how at Making It With Danielle

8). Vittsjo Shelves
Turn boring black metal shelves into fantastic gold works of art. There is a DIY how-to over at Four Generations One Roof!  
 

9). Klubbo Coffee Table
There are no tutorials for this specific table...but it's pretty basic if you follow the instructions on the contact paper! This definitely upgrades the look. 

10). Updated Stools
Look these drab-to-fab stools! Learn about it at From Me, With Love!  
 
Alright! That's ten! I hope you guys got some good ideas from these lovely bloggers and I would love to see what you come up with! Leave your ideas in my comment section!

Don't forget to subscribe via email! (We never spam!) and follow me on social media for more daily inspiration! Pinterest : Shannan Gladwin Instagram: @thecaliforniacupcake 

XO.

Wednesday, December 2, 2015

Dollar Store Storage Bins!!

Alright, who else had a crazy busy thanksgiving week(end)...cause it could not have been just me. My soon-to-be in-laws (that's so many dashes..) were here for the last 10 days and it was insane. I like to think I'm pretty lucky in the in-law department. I've been around the Roczey (sounds like: Roxy) family for almost 8 years, and even lived with them for three, so there's definitely no filters or boundaries there, which makes the holidays crazy - in the best way. I can't wait until we can all live in the same state and have huge family holidays. But, for now, we live in Minnesota, where it's currently snowing, and cold, and windy. But it definitely gets you into the holiday spirit!

Anyways, having family visit really makes you take a look at your home and all the things it's missing (or is that just me?) So before their visit I did a little sprucing and purchased a few things which I'll be sharing any day now. One of the things I didn't quite get to was the two bookshelves in the living room. I don't believe I've showed those to you guys yet, but their just white IKEA bookshelves on either side of our TV. I'm starting to figure out that, as much as I love a good bookshelf, they are so hard to decorate when you're on a budget, simply because it feels like you need so many little things that you might never actually use, but their nice to look at....and let's face it, "nice to look at" is a lot harder to spend money on than something you'll use or wear everyday. Am I right?! I found myself obssesively noticing these empty bookshelves and hearing them taunt me...okay, I'm being dramatic, but they totally bothered me. I decided to find a way to fill some of the space with some storage bins becuase I needed a place for all the miscellaneous things in our house, like spray paint, tape, spare chargers, etc. That's what brought me to the dollar store! I found these HIDEOUSLY blue buckets...


I knew that with a good coat (or two) of metallic gold spray paint, these babies had real potential. And for only a dollar a piece it was such a steal. 

Now, spray painting plastic is not an easy task, but with some trial and error, I have a few small tips that make all the difference. You're going to want to start with these items...

Shown here 
Valspar Metallic - Brilliant Gold : $5.88
Disposable gloves from the Dollar Store : $1 for 100 of them
Plastic drop cloth from Lowe's : $2.00
I have a clear acrylic coat shown here too (the white can) but I did not use this! It ruins the metallic spray paint...as I learned the hard way...
Not shown here:
Sand paper from Lowe's : $2.00
Optional** Valspar Plastic Primer (I didn't use this just because I didn't have it on hand and I didn't learn about it until after I painted...oops. But it will help the paint stay put over time.)

First:
Make sure you clean your containers with soap and water first and dry them really well. If you're working with a really smooth surface, run some sand paper over them to give it a little texture. Wipe away any excess. Then lay down your drop cloth in a safe work space and place your buckets face down. 

Second:
If you have the plastic primer, this is the time to use it. Then spray paint all sides of your buckets angling the spray can downwards. Make sure to do multiple light coats rather than one heavy coat so that it doesn't drip. Don't forget the gloves!!


Three:
Finish the outside walls first and allow them to dry for about an hour. Then flip them over and lightly coat the inside, let dry, and repeat until fully covered. 
Four:
After you finish painting your containers give them a solid 12 hours before you handle them lightly and a few days to settle before you use them or handle them roughly. The downside to painting plastic is that it takes a long time for the paint to settle. But it's worth the wait! Here is what your finished product should look like!
Here is a before an after...gold spray paint is a miracle! (Ignore the frost on the gold one, I left them outside overnight and it was like 13 degrees outside...oops! They were fine once they defrosted!)
Here they are in action on our bookshelf! Ill post a picture of both shelves when they are finished!
 Here are all the deets on the other decor on the shelves!


 The gold ball is from Kirkland's. It was actually a gift so I'm not sure about the price but here is a similar one! The magazines are a mix of bridal mags and fashion mags. I honestly don't really read them, but they fit it with the color scheme so they found their home in my living room! The flowers are fake and from pottery barn. I got them YEARS ago so I doubt they have them anymore, but you can find similar ones at any home decor store...like Home Goods!
I literally died over sheer excitement after I put this together...I have a seriously ridiculous obsession with anything Kate Spade, so when I came across this shopping bag from their store I knew I just had to use it somewhere in my house! I had these fake white roses from The Dollar Tree. They come in bunches. I used three bunches and cut them into single stem flowers so I could manipulate them more easily.  I messed around with them in the bag until I got it how I wanted it...and that's it! So, like $3! I stare at it all the time!
The candle is like a faint blush color and its beaded. I got it from Home Goods for $4.99 and it fits in my color scheme so perfectly its insane! The candle holder is also from Home Goods and it was $6.99 I believe. 


I love how easy the containers were and how great they came out! Ill be adding labels to them so I know what each one is holding. But other than that, they are done and I no longer have to stare at an empty bookshelf! Win, Win!


Thanks so much for checking in and reading today guys! Don't forget to subscribe via email (you will not get any spam, only one email if I post something new.) and follow me on instagram : @thecaliforniacupcake

Leave me comments if you have any questions or if you have any good tips I missed!

XO.