Friday, October 30, 2015

10 DIY's To Update Your Rental Space!


Hi Cupcakes!

I feel like, no matter how expensive or inexpensive your home may be, everybody has at least one space in their home that they are just not completely satisfied with. I can say that personally, when you rent your home, sometimes it can be frustrating because you have to just work with whatcha got. (Especially if you ever want to see that pretty little security deposit again). If you read my recent post, New Apartment Tour, then you know that I'm really obsessed with our new apartment! But even with a space that you absolutely love, there can be things that drive you nuts...like a window that's not centered with the wall, or an outdated piece of furniture that you just can't afford to replace right now. 
Well, fear not my little cupcakes, because today I'm super excited to talk about a few small things you can do at home to make your space feel more expensive and updated! The best part of this list, is that all of these tips and tricks are rental appropriate...in other words, you'll still get that nice little security deposit check at the end of your lease! ;)


1. Hang your curtains high and wide!
This is absolutely my favorite home hack! Most people hang their curtains at the top of the window, and usually just as wide as the window. However, hanging curtains high and extending the rod and curtains further on each side, will make the room feel much larger and it can really open up a space. It creates the illusion that you have higher ceilings and bigger windows. This is a great trick especially for people living in apartments that don't have vaulted ceilings or nice big windows! Another little thing you can do to take it a step further, is add two curtains on each end of the rod to make your curtains look full and luscious. Make sure you measure from where you want to hang your rod before you head out to buy your curtains, the standard 84" and 96" curtains may not be long enough for this vaulted look! Below is a great example of the difference it can make in your room, courtesy of Sprinkled Nest. Check out her post all about her curtains and what a difference it makes to hang them high! 


***As a side note, this trick also works in the bathroom! Hang your shower curtains high for a more expensive, dramatic look! Check out Lovely Crafty Home's how to on this!


2. Update Your Hardware!
A quick, easy, cost efficient way to update your kitchen, your bathroom, or any other space in your home with cabinetry, is to update the hardware! When I say "hardware", I mean the knobs and/or pulls on your cabinets. You can head over to Home Depot or Lowe's and check out their knobs; find one you like best, wether you like a modern look, or maybe an antique look. Just make sure, if you are renting your space, that you store your existing hardware in a safe place so that you can put it back when you move out! If you are not renting and want to save a penny or two, you can grab a can a spray paint and give your existing hardware new life! 


3. Add Brass Corners To A Plain Ikea Coffee Table!
Ikea is a great place to get inexpensive furniture, but sometimes it can be a little boring and plain, luckily, there are plenty of great tricks like this to spruce them up! Check out Style At Home for a quick and easy tutorial on this baby! 


4. Hang Two Shower Curtains So They Open From The Middle!
Hanging two curtains on either side of your rod give your bathroom and updated luxury feel!


5. Add Flowers To Every Room
Adding flowers, or any plant for that matter, to a room brings the outside, in, and really adds life to a space! You can use real or fake flowers for this trick, but real live plants are always best! And if you are looking for a vase, check out one of my recent projects Repurposed Wine Bottles!


6. Wrapping Paper Wall Paper
So, this one, I just discovered myself, and as an apartment renter...I am so freaking excited about this one!! Guys, you can actually use wrapping paper and double sided tape to replace expensive wall paper! Im DYING over it! So perfect for apartment renters, or even people who own their space but just like to change up their rooms way to often..(guilty!) Anyways...check out this step by step guide to get this AMAZING wall!


7. Fix A Window That's Off Centered!
One of my biggest pet peeves in a home, has got to be when a window is not centered with the wall! Drives me nuts! Luckily there is an incredibly easy way to fix that! All you have to do is hang your curtain rod and your curtains centered with the wall, rather than the window! Viola! Now your window appears to be centered...and bigger, which is just another plus! (Don't forget to hang those babies high!) Check out Sawdust Girl's how to!


8. Paint Outdated Furniture!
If you are a regular reader of California Cupcake, you know that I am a huge fan of painting old furniture! It's such a cheap way to make something old look new...well, you know the drill. Check out my Dining Room Table Make-Over , or my Updated Bedroom Furniture for a few easy examples!


9. Contact Paper
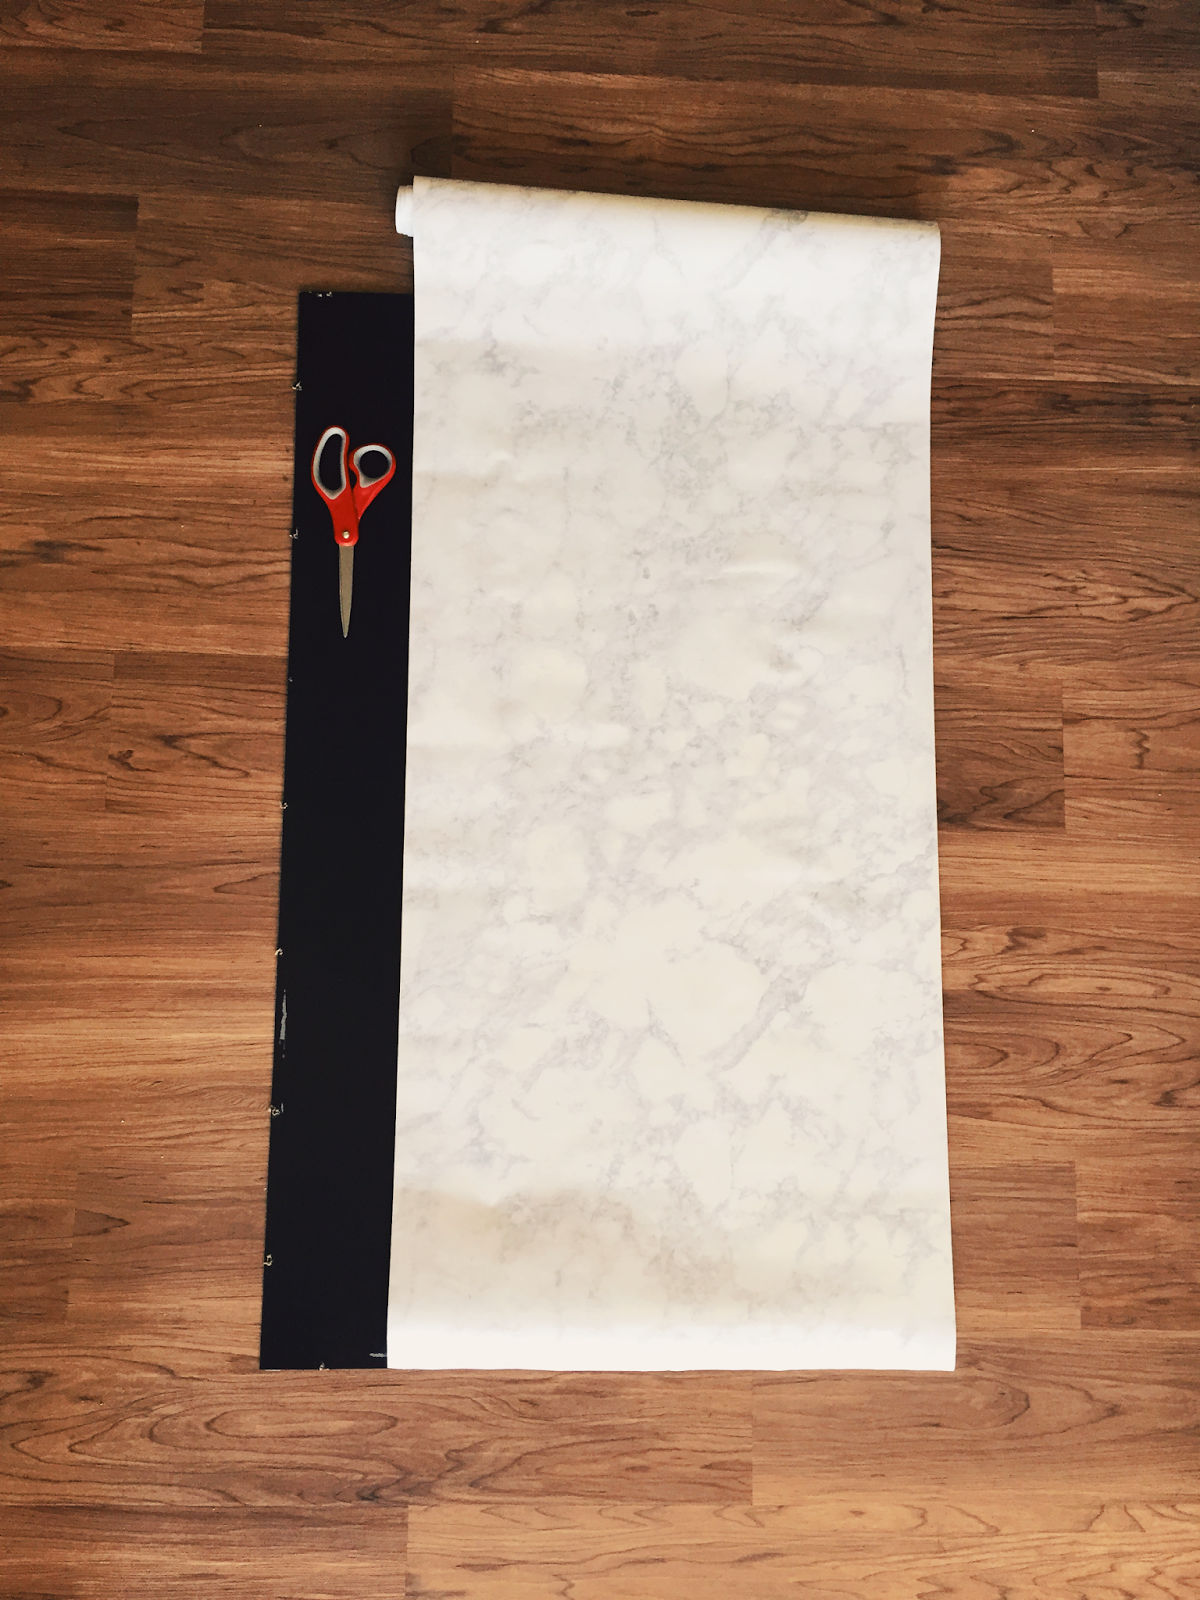
Contact paper is a recently discovered holy grail in my world! You can literally put it on everything in your house that you don't like! Okay, maybe not EVERYTHING, but it seriously fixes a whole lot. Like a bookshelf, for instance...remember the bookshelf we fancied up with white granite contact paper?


But, a bookshelf isn't the only thing you can use contact paper for! You can use to on a coffee table, or your bathroom counters, or even your kitchen counters for a faux granite look! The possibilities are endless!


10. Add Area Rugs 
Adding area rugs can completely tie a room together. It can help determine the energy or feeling of a room and, if placed correctly, can make a room feel much bigger and open! Take a look at this post by World Market to find the best size rug for your space!


So there you have it! Making your space look more expensive is easy with tricks like these. If you have any tricks not on this list, feel free to share them in the comments section! 

Hope you enjoyed today's post! Don't forget to subscribe via email (You will only get an email when I post new content!) and follow me on social media for inspiration and updates! Instagram: @thecaliforniacupcake Pinterest: Shannan Gladwin

XO.


Friday, October 16, 2015

Giveaway!

Hi Cupcakes!!

So, again, I'm writing to you from the car, on my "blogger" iPhone app...so bear (bare?...I'll never learn that I swear) with me on the editing stuff until I can get to a computer!! 


Anyways! Today is a really fun day because I get to finally announce the very first ever giveaway on California Cupcake!!! I know I'm probably way too excited over this, but do me a favor and at least pretend to be equally excited...thanks. Okay, so I've teamed up with the awesome chick that runs Scarlett Jay, which is a new etsy shop that is up and running! She sells personalized foil art pieces that I totally love...I'm all about foil lettering right now! Anyways, we teamed up and came up with a super cute concept that she created and tonight, we are starting the contest for one lucky duck to win this print! The contest will be run through Instagram, so if you don't have one...well, get one, where have you been?! So make sure to watch out for it on @thecaliforniacupcake and @scarlettjay tonight and over the weekend! Can't wait to see who wins! 

That's all! New post...coming soon!! 

P.S. Here is the link to the Scarlett Jay Epsy store if you wanna check out/buy her other work! 

https://www.etsy.com/shop/ScarlettJay?ref=hdr_shop_menu


XO. 


Thursday, October 8, 2015

Spruce Up Your Bookshelf for $7!

Hi Cupcakes!

It's been WAY too long since my last post. I suck, for real. I know. But, I think my next few posts will be worth that wait! AND, I have a couple really fun surprises for you guys this month! Get excited! 
Also, I am officially part of the "visual team" at Pottery Barn...which basically means I am responsible for floor sets and making things look pretty, which means so so so many more inspiring things to share with you guys here and on my instagram account @thecaliforniacupcake! So don't miss that! I don't have much else to share with you guys right now so let's just jump right in to this little how-to!

So today I'm talking about sprucing up a boring (cheap) bookshelf! And no...no painting this time ;) This project is so quick, easy, inexpensive, and versatile. I just love it. This can totally be done by yourself, but it's significantly easier with a little helper (or a big one)...I recruited the Mr. for this one...so when you see some hairy arms in these pictures...don't worry, it's not me! Okay, so some of you may have heard of contact paper You can buy it at Lowe's and it's like $7 for a few yards or something like that. It's stupid how affordable it is considering how many uses it has. Well, today, we're using it on the back of our bookshelves to add some glam to an otherwise plain piece of furniture. Check out the step-by-step!

Thing you'll need:
Contact Paper : I used "white granite" from Lowe's - $7
Scissors or a razor blade
Credit Card, Gift Card, or anything similar
Hammer
Obviously, a bookshelf...

STEP ONE :
Start by taking off the backing of your shelves. This is the last piece you attached when you put the shelves together. The nails should pop right out, don't worry about tears on the edge of the backing because you won't see them when you re-attach it. 

STEP TWO:
Here is the contact paper we chose. Feel free to use any color/design you like! Get creative! Unroll your contact paper and lay it out on the front of your shelf backing. Make sure to line it up with the bottom before you cut it! 


STEP THREE:
Now it's time to cut your contact paper to size. In this step, it's better to cut it too long than too short...excess can be removed, but you can't really add on extra to the bottom. Catch my drift? I didn't worry too much about the cut line being perfectly straight because I knew I would be cutting off the excess later. 

STEP FOUR:
Now that your contact paper is cut to size, peel off the backing...contact paper is just like one giant sticker. Don't worry too much about it catching on something because you can pick it up and reposition it pretty easily. Once you have the backing peeled off, turn it over, line it up with the edges of your backboard and put it down. 

STEP FIVE:
For the next step, take whatever card you grabbed, and, starting from the middle...smooth out any air bubbles by pushing them out to the edge of the paper. I honestly thought this part would be a lot more difficult, but the bubbles just come right out! 

STEP SIX:
After you push all the bubbles out of your first section, measure out your contact paper for the remaining part of your backboard and repeat steps 3-5 until your whole piece is covered! 

STEP SEVEN:
Grab your bookshelf, putting it face down on the floor, and put your backboard (also, face down) on top, making sure to line it up with all your edges. Don't worry about the excess on the edges just yet...that's next! Grab the nails you removed in the first step...and your hammer, and start hammering away...

STEP EIGHT:
Now, for the excess paper on the edges, you have two options. Your first option is to grab your scissors and cut along the edge of your bookshelf to get the extra lined up right. Your second option is to just fold over the excess and stick it to the back, nobody sees the back of a bookshelf anyways, so don't worry about what that looks like. It's totally your choice! Try both and choose that way!


AND WE'RE DONE!!!


I love how simple and inexpensive this DIY project is guys! It cost me $7 to do this and it took me maybe 30 minutes! I used the white marble look because our bedroom is very glam and the color scheme is white, grey and black, so it just fit. And just as a side note, if there aren't any contact paper colors you like, you can also do this project using wrapping paper and double stick tape...but thats another post for another time ;) Let me know if you're interested in seeing that! 

Hope you guys liked today's post and I hope it was helpful! Leave me comments and tell me how you like to dress up your boring furniture! And don't forget to subscribe via email to get updates when I post new stuff! If you don't already, follow me on social media for daily inspiration and fun! Instagram : @thecaliforniacupcake Pinterest : Shannan Gladwin


XO.